Hot/Neutral/Ground

With Brock U Prof. Don Cyr and Prof. Pei Jingang at Foshan University School of Art and Design, November 2011

At the end of this month, I’ll embark on my ninth trip to China, to promote NSCAD and the MDES program in Beijing, Shanghai and Guangzhou. Last fall, while in the Pearl River Delta region, a small group of four of us took a 30-minute drive from our hotel — The “Good International Hotel of Guangzhou” * — to Foshan University. Foshan is the third largest manufacturing city in the Pearl River industrial region, after Guangzhou and Shenzhen. There I met Prof. Pei Jingang, Head of the School of Art and Design. Prof. Pei showed me a gallery full of student-made product design prototypes by students. The school has an arrangement with RMIT where students from Melbourne work with local Foshan manufacturers to develop prototypes of their designs. Some of these prototypes have even been manufactured, such as the set of steel cookware that was on display.

This year, I’ve been invited to stay on in southern China to conduct a workshop with the Foshan design students on developing a new design for an electrical power bar — the device that you plug into a wall that has 6, 8 or more sockets. These power bars are very useful when you have small electronics that use square adapters. The design problem is that the size of the adapters often prevents access to many of the remaining power outlets. Some excellent solutions are already on the market, notably power strips that have sockets that rotate or reconfigure in some way. As I say, some of these products solve the problem admirably, but one objection — one that will be settled over time and use — is that these movable socket contacts will eventually wear down, causing interruptions, sparking, or even fires. My idea is to accept that there will be large plug adapters and regular-sized plugs, and rather than providing a means to articulate and spread out the sockets, I propose to make more of them and fix them in a small space. I’ll double the density of the outlets by slot-sharing and interlocking the sockets at 0/90/180 and 270-degree angles. This fixed form will allow a greater flexibility in access. There are several consumer electrical manufacturers in the Foshan area and I hope one of them can be involved in the development process.

I’ll be in Foshan from November 14 to 23, and I’ll hopefully be able to give blog updates — GFC notwithstanding — on the progress of this project.

* Arriving from the airport, as our bus passed the hotel’s front gate, Jerzy Zawistowski remarked, in his dry Polish accent: “Finally! We get to a good international hotel!”
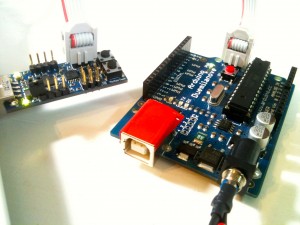
Guide to Burning Arduino Bootloader using ZeptoProg II and AVR Studio

If you’re interested in working with Arduino microcontrollers, eventually you become hip to the idea that you don’t need to buy expensive Arduino UNOs for your projects. It’s relatively simple to wire up your own minimal Arduino, saving 80% under the cost of an UNO or Duemilanove. I develop on a Duemilanove, and when I need to commit the work to the final project, I can pop out the ATmega328 chip that’s in the Arduino and plug in a fresh ATmega328 to program it. Actually though, you can’t just use any ATmega328 chip — it needs to have a “bootloader” program flashed onto it before it can work with the Arduino system. You can buy ATmega328’s with the Arduino bootloader, but these go for around $4.00 each. You can buy the same chips without the bootloader for about a dollar less, or more than that if you buy in bulk.

To install the bootloader software, you need a device that hooks into the ISP plug on your UNO or Duemilanove. I had an AVRISP mkII that I bought a few years ago, but it stopped working so I needed a replacement. Although I could use my BusPirate as an AVR Programmer, the documentation for that uses the command-line AVRDUDE to communicate with the chip. I wanted to use a toolchain I was more familiar with, the free AVR Studio, version 4.

I bought the replacement a couple of months ago on ebay: ZeptoProg II is an inexpensive AVR programmer with USB interface, and works with AVR Studio. It also sports a 4-line logic analyser and frequency output and measurement, and a few other widgets that I probably won’t ever use.

Most of the time involved in setting things up relates to installing AVR Studio. The version I use is 4.18, so you need to download the core version and then upgrade it incrementally with several service packs. Although I’ve been a Mac person since 1984, I develop on a Win7 netbook partly because AVR Studio on Mac OS X has not been kind to me.

The Guide

I’ve prepared a PDF Guide to Burning Arduino Bootloader using ZeptoProgII and AVR Studio.

Once you’ve mastered this, you can go on to bypass the Arduino altogether: for example, if you are running out of space on your ATmega chip, you can erase the bootloader — gaining about 2k — and use the programmer to flash the HEX file that you created when you compiled the Arduino program onto the chip. An added bonus to removing the bootloader is that on power-up or reset, your project starts faster because it doesn’t have to run the bootloader code.

Note to self: Use Tellymate when Debugging Arduino!

Tellymate is an Arduino shield that outputs all Serial.print() commands to a television (NTSC or PAL composite video). I’ve had one kicking around for a couple of years now. I bought it thinking that I’d like to build a “new” kind of interface/display. I even bought an inexpensive portable TV/DVD player for the purpose. That project is still on my ‘to-do’ list, but I had another problem—that Tellymate solved simply and elegantly.

I’ve been picking at the Media Circus project for about year, making improvements, letting it run to see if any bugs cropped up. Media Circus is a scrolling marquee that displays amusing headline news mashups. It receives updates from Twitter once a day, early in the morning. To do this, it needs to self-reset. This is not simply a matter of running a wire from a digital output pin to the Reset pin on the Arduino. A dependable self-reset requires a delay and ‘safety switch’ circuit.

The Problem…

Because the unit resets only once a day, I needed several days to test it. It seemed to work as designed with more frequent resets using a test program, but when I incorporated my reset code into the Media Circus sketch and let it run, I discovered that it would reset the first time, but never again. I needed to know what was going on in the program. Using the Arduino IDE, if you want Arduino to tell you what state it’s in at various points, you drop in Serial.print() statements and then open Arduino’s Serial Monitor. For short runs, this works, but Serial Monitor sometimes crashes if you give it lots of data to display over a long period of time. Additionally, when the system resets, it closes the Serial Monitor.

My next thought was to bypass Serial Monitor and attach a small LCD screen to show the various values. I tried the Arduino built-in LiquidCrystal library, but it didn’t work for me with the particular arrangement of hardware and software—I wasn’t able to figure out precisely why. Next, I tried a different library, arduinoshiftreglcd, which worked with the MEGA and the Ethernet Shield, but failed when in the presence of the Ethernet or EthernetUDP libraries. I was about to look at the New LiquidCrystal library, when I remembered the Tellymate.

The Solution…

Tellymate doesn’t require any additional code: if you can print to the Serial Monitor, it will show up on the TV. But there are two very simple functions that Batsocks provides that were useful to me: screen_clear and cursor_move. My TV display shows the number of seconds since midnight, the rough geographic location (Beijing/Moscow/London/Halifax/Vancouver) and Daylight Savings Time/Standard Time, and the epoch time at reset. This has finally allowed me to find—and solve—the problem!

And now, for today’s headline (June 8, 2012):

Small plane crashes on who’s giving it all away

You can look at the other headlines that are running on Media Circus, or follow General Eccentric.