Using an Arduino, a simple three-wire ultrasonic rangefinder, and an RGB distance indicator, you can park your car with precision.
Contrary to most people I know who have garages, we still use ours to store our car. And when we did a minor garage renovation—actually, it was more of a cleanup and reorganization—I decided to build a gadget that would give us an indication of how close we are to the back (inside) wall of the garage.
There are many devices available for drivers to help them gauge their car’s position. My brother Ralph has a simple low-tech solution: hang a tennis ball from the ceiling. Works great as long as you always enter the garage leading with the front of the car. Other solutions include a laser, a stopper on the floor, a photo-electric beam, and an ultrasonic rangefinder from GE—Not General Eccentric. Those other guys.
The GE device is battery-operated and uses a red/yellow blinking LED for driver feedback. This device can be configured to display red at a distance of 1, 2, or 3 feet from the rangefinder.
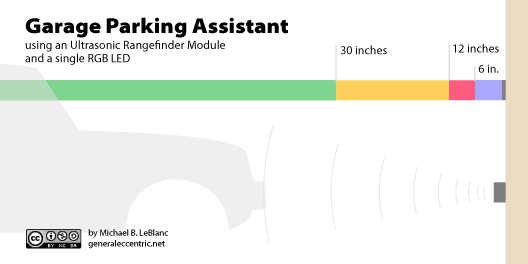
My device operates using a wall transformer (actually, I’m using spare capacity from the transformer that powers my Oil Tank Level Sender project) and employs a non-blinking RGB LED that glows green until the car bumper reaches 30 inches distance to the rangefinder, orange from 30 inches to 12 inches, red from 12 inches to 6 inches, and blue/purple 6 inches or less.
Download Electronic schematic (pdf).
Here’s the sketch, which is adapted from the David Mellis/Tom Igoe “Ping Sensor” example that comes with the current Arduino IDE:
/* Ping))) Sensor

   This sketch reads a PING))) ultrasonic rangefinder and returns the
   distance to the closest object in range. To do this, it sends a pulse
   to the sensor to initiate a reading, then listens for a pulse
   to return.  The length of the returning pulse is proportional to
   the distance of the object from the sensor.

   The circuit:
	* +V connection of the PING))) attached to +5V
	* GND connection of the PING))) attached to ground
	* SIG connection of the PING))) attached to digital pin 7

   http://www.arduino.cc/en/Tutorial/Ping

   created 3 Nov 2008
   by David A. Mellis
   modified 30 Jun 2009
   by Tom Igoe

   This example code is in the public domain.

 */

// this constant won't change.  It's the pin number
// of the sensor's output:
const int pingPin = 7;
const int redPin = 6;
const int greenPin = 5;
const int bluePin = 4;

void setup() {
  // initialize serial communication:
  //Serial.begin(9600);
  pinMode (redPin, OUTPUT);
  pinMode (greenPin, OUTPUT);
  pinMode (bluePin, OUTPUT);
}

void loop()
{
  // establish variables for duration of the ping,
  // and the distance result in inches and centimeters:
  long duration, inches;

  // The PING))) is triggered by a HIGH pulse of 2 or more microseconds.
  // Give a short LOW pulse beforehand to ensure a clean HIGH pulse:
  pinMode(pingPin, OUTPUT);
  digitalWrite(pingPin, LOW);
  delayMicroseconds(2);
  digitalWrite(pingPin, HIGH);
  delayMicroseconds(15);
  digitalWrite(pingPin, LOW);
  delayMicroseconds(20);
  // The same pin is used to read the signal from the PING))): a HIGH
  // pulse whose duration is the time (in microseconds) from the sending
  // of the ping to the reception of its echo off of an object.
  pinMode(pingPin, INPUT);
  duration = pulseIn(pingPin, HIGH);

  // convert the time into a distance
  inches = microsecondsToInches(duration);

  if (inches > 30) {
    digitalWrite(greenPin, HIGH);  // green LED
    digitalWrite(redPin, LOW);
    digitalWrite(bluePin, LOW);
  }
  else if (inches <= 30 && inches > 12) {
    digitalWrite(greenPin, HIGH);
    digitalWrite(redPin, HIGH);    // orange LED
    digitalWrite(bluePin, LOW);
  }
  else if (inches <= 12 && inches > 6) {
    digitalWrite(redPin, HIGH);    // red LED
    digitalWrite(greenPin, LOW);
    digitalWrite(bluePin, LOW);
  }
  else {
    digitalWrite(redPin, HIGH);    // purple LED
    digitalWrite(greenPin, LOW);
    digitalWrite(bluePin, HIGH);
  }

  delay(100);
}

long microsecondsToInches(long microseconds)
{
  // According to Parallax's datasheet for the PING))), there are
  // 73.746 microseconds per inch (i.e. sound travels at 1130 feet per
  // second).  This gives the distance travelled by the ping, outbound
  // and return, so we divide by 2 to get the distance of the obstacle.
  // See: http://www.parallax.com/dl/docs/prod/acc/28015-PING-v1.3.pdf
  return microseconds / 74 / 2;
}
Parking Assistant by Michael B LeBlanc is licensed under a Creative Commons Attribution-Noncommercial-Share Alike 2.5 Canada License.
Contact the writer for permissions beyond the scope of this license.


Hi
Thank you for your project.
Why don’t you use your website to teach us very simple circuits with arduino especialy for beginners.Create a website where we both can benefit more!
I am struggling to setup or start my arduino and to write programs.
Whe can find arduino ebooks?