Category Archives: design

A Design for a Remote Fuel Oil Gauge III

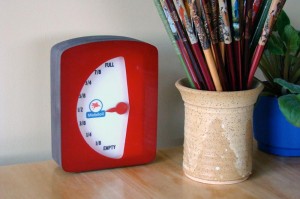
My previous post on this subject dealt with the fuel oil level sender unit which sits atop the fuel oil tank in the garage. It has a look only its creator could love. On the other hand, the receiver unit needs to reside in the kitchen, so it has to be, at worst, presentable, and at best, a work of art.

The result is something in-between.

I wanted my receiver box to have an art deco-retro look, something like this or this. Most commercially-available project boxes are utilitarian in design. They lack the curves and finish of early 20th century North American manufactured goods (to say the least), so I designed my own.

I was constrained by lack of access to a complete range of wood- and metal-working machinery, so compromises had to be made. I decided to build the box out of medium density fibreboard, sandwiching together several layers to build depth. MDF is relatively easy to work, although it’s not a good idea to breathe in the dust.

One other aspect of the look relates to my fascination as a child with gas stations and large signs. I remember visiting my grandparents in Wakefield, MA in the middle of the summer; late at night I could part the sheer curtains in the second floor bedroom and look through the trees at a large neon “Pegasus” Mobil Oil gas station sign. I remember being rather disappointed several years later, not being able to see the sign and realizing that it had been replaced by a more modern fluorescent sign that didn’t blink on and off. So I wanted to have the pegasus represented somewhere in my design.
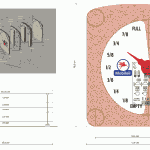
My design uses 5 layers of MDF, with thicknesses ranging from 1/8″ to 1/2″. The different layers needed to be cut differently to accommodate the electronics, which included the SMCC-547 stepper motor and an Arduino controller.

When I designed the box, I used Cinema4D to work out how the parts would all fit together in 3D. I also used Adobe Illustrator to work out the measurements. Once I had the plan I gave it to my son Daniel, a NSCAD sculpture major, to cut the MDF and clear acrylic. Unfortunately there was a misunderstanding regarding dimensions. I won’t go there, except to say that even NASA has made this mistake.

It took some time to mitigate the effects of the misunderstanding, but in the end the result is satisfactory.

Electronics Hardware: The Receiver
Oil Level Receiver
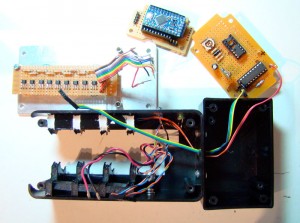
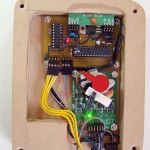
Internal view: Oil level receiver

The receiver has an Arduino brain and uses an On Shine RX A27 receiver (the pair of the transmitter in the sender unit). The received code is received by a Holtek HT12D decoder which passes along three bits of data to D6-D8 of the Arduino chip. My original design used an Arduino Mini Pro, but instead I installed the Arduino bootloader onto a virgin ATMEGA8 chip and set the fuses to run with the internal oscillator at 8 MHz. This was a much more economical choice than using the Mini Pro: $5 versus $30. The Mini Pro runs at 16 MHz and has 16kb of program storage while my minimal ATMEGA8 runs at around 8 MHz and has barely 7kb of program storage, but since I did not need the speed and the firmware fit easily into the 7k space, the ATMEGA8 was completely adequate.
Circuit for the receiver
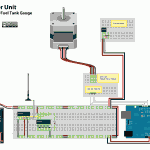
The receiver circuit

The Arduino receives the 3-bit information from the decoder and uses D10-D13 to drive the SMCC-547 stepper motor module. In addition, the Arduino’s D2 pin is configured as an input from an hall effect position sensor: at power-up, the initialization routine in the software rotates the pointer counter clockwise. The pointer has a tiny magnet on its underside and when it approaches the sensor which is mounted on the motor, the rotation stops, effectively ‘zeroing-out’ and initializing the pointer position.


The Software

The actual work is accomplished by two routines: rotateRight() and rotateLeft(): The level of the oil tank is expressed as a three-bit binary number (binary 000-111 or decimal 0-7). The current level is compared to the previous level. If the current level is higher than the previous one, rotateRight() is invoked, which moves the pointer higher. If the current level is lower than the previous one, rotateLeft() is invoked which moves the pointer down.

A function called getLevel() converts the binary coded data into decimal.

As mentioned above, on power-up, the last state of the pointer is unknown, so the pointer is set to the zero point on the gauge. Once this is done, the main loop can commence.

/*
Stepper Motor SMCC-547 for Oil Tank Level Indicator v. 1.0

 by Michael LeBlanc
 NSCAD University
 mleblanc@nscad.ca

 It receives a binary value from 0 - 7 and moves the pointer
 accordingly.

 March 30, 2010
 */

/*
**************** N O T E **************************************
 This unit does not work with the stepper.h library.
 It works by setting one pin high and the others low.
 To rotate clockwise, set inputs high in order A-B-C-D,
 and D-C-B-A rotates counterclockwise.
 ***************************************************************
 */

int activePin = 1; // which of the 4 pins to the motor is high
int outputPin[5] = {
 0,10,11,12,13};  // stepper motor pins
int level;  // the current level of the oil tank
int oldLevel; // the previous reading of the level
int motordelay = 10; //standard stepper motor delay

void setup()
{
 pinMode(10, OUTPUT); // to A input on motor
 pinMode(11, OUTPUT); // to B input on motor
 pinMode(12, OUTPUT); // to C input on motor
 pinMode(13, OUTPUT); // to D input on motor
 pinMode(6, INPUT); // 1's digit of oil level
 pinMode(7, INPUT); // 2's digit of oil level
 pinMode(8, INPUT); // 4's digit of oil level
 pinMode(9, INPUT); // 8's digit of oil level (not required)
 pinMode(2, INPUT); // position sensor

 // step the pointer two to the right
 rotateRight();
 delay(motordelay);
 rotateRight();
 delay(motordelay);
}

void rotateLeft()  // rotate counterclockwise routine
{
 if (activePin == 4)
 {
 activePin = 1;
 digitalWrite(outputPin[4], LOW);
 digitalWrite(outputPin[1], HIGH);
 }
 else
 {
 digitalWrite(outputPin[activePin], LOW);
 activePin = activePin + 1;
 digitalWrite(outputPin[activePin], HIGH);
 }
}

void rotateRight()   // rotate clockwise routine
{
 if (activePin == 1)
 {
 activePin = 4;
 digitalWrite(outputPin[1], LOW);
 digitalWrite(outputPin[4], HIGH);
 }
 else
 {
 digitalWrite(outputPin[activePin], LOW);
 activePin = activePin - 1;
 digitalWrite(outputPin[activePin], HIGH);
 }
} // end rotateRight routine

int getLevel()
{
 int L0 = digitalRead(6); // read 1's digit of level
 int L1 = (digitalRead(7)*2); // read 2's digit of level
 int L2 = (digitalRead(8)*4); // read 4's digit of level
 level = ( L0 + L1 + L2 ); // convert to decimal
}

void loop()
{
 // initialization routine to set pointer to zero //

 if (digitalRead(2) == LOW)
 {
 //digitalWrite(3, LOW); // for debugging
 while (digitalRead(2) == LOW)
 {
 rotateLeft();
 delay(motordelay);
 }
 //digitalWrite(3, HIGH); // for debugging
 }
 else
 // set the pointer to the level //
 {
 getLevel();
 for (int i=1; i<=level; i++)
 {
 rotateRight();
 delay(motordelay);
 }
 oldLevel = level; // set oldLevel to equal current level

 /*-----------------------------------------------
 now manage incremental changes up or down //
 --------------------------------------------*/

 for (int looop=0; ; looop++)  // endless loop
 {

 getLevel();
 //Serial.print("Old Level: ");
 //Serial.print(oldLevel);
 //Serial.print(" Level: ");
 //Serial.print(level);
 //Serial.println(" ");

 if (oldLevel == level) // if there is no change, do nothing
 {
 delay(motordelay);
 }
 else if (oldLevel > level) // if level goes down, rotate left
 {
 rotateLeft();
 //Serial.println("rotate left");
 oldLevel = oldLevel - 1;
 delay(motordelay);
 }
 else
 {
 rotateRight();  // level has gone up; rotate right
 //Serial.println("rotate right");
 oldLevel = oldLevel + 1;
 delay(motordelay);
 }
 }
 }
}

Creative Commons License
Remote Fuel Oil Tank Gauge by Michael B LeBlanc is licensed under a Creative Commons Attribution-Noncommercial-Share Alike 2.5 Canada License.
Contact the writer for permissions beyond the scope of this license.
A Design for a Remote Fuel Oil Gauge II

In my first post for this project I outlined its overall design. In this post I’ll describe the “sender” unit that senses the fuel oil level, interprets it as a three-bit number and sends this number to the receiver in the kitchen.

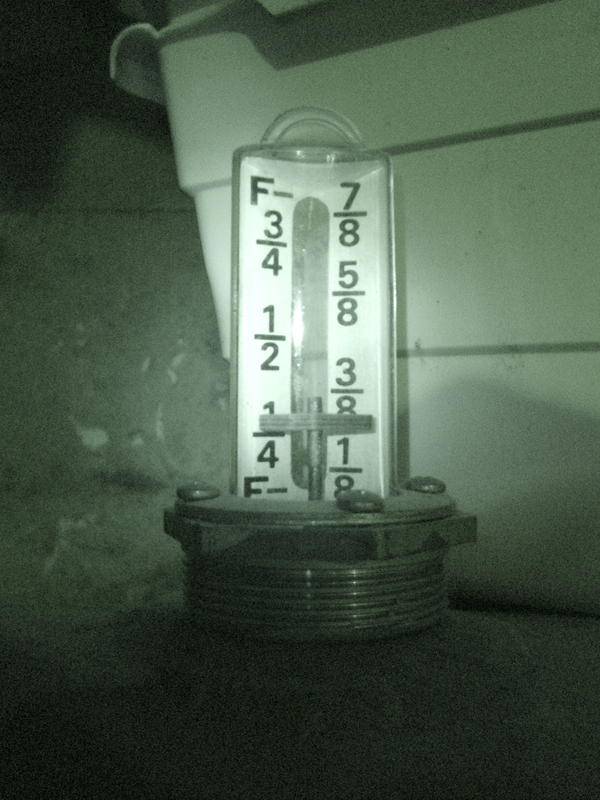
This is a photograph of the mechanical gauge, which shows the level as eights of a tank. The float that moves up or down will provide the shelf upon which I’ll glue a small rare earth magnet.

To ensure that the magnet is sensed, I had to do some careful measurements and calculations: the clear plastic covering of the gauge has a cross-section that is oval, and it is also tapered slightly so that it has a smaller diameter near the top.

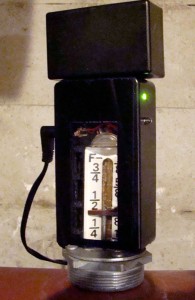
My plan was to fit a plastic box over the gauge so that the sensors would be as close as possible to the magnet, and to allow for visual inspection of the gauge at any time.

I mocked up a test using some scrap foamcore and blue modeling foam to see how a box could be snugly fitted to the gauge. I decided that a good solution would be to create carefully cut foamcore ribs for the inside of the box that would hold on to the sides of the gauge yet still allow for room of the sensor unit and other electronics. As I discovered later, I did not have enough room for the radio circuit, so I had to add another small box on top of the main box. If I do this again, I’ll use a bigger box.

I cut a long hole along the length of the box so that anyone could see the mechanical gauge, given enough light. The sender unit slides down over the gauge and can be easily removed for maintenance.

The SS461A hall effect sensors that I purchased from Jameco are “latching,” which means that when a magnet passes one in one direction, it turns on and stays on until the magnet passes in the opposite direction. This is good in one way, and bad in another.

The positive aspect of latching in this context means that, as the fuel oil tank is filled, the gauge goes up and progressively latches each sensor “on” as it passes. You could read the sensor array and it present it as a bargraph. As the oil is used and the level begins to move down, the topmost sensor is turned off, then the next in line is turned off, and so on.

The negative aspects of this arrangement only presents itself outside of normal operation. Say, for example, there is a power failure? How does the sensor array know where the magnet is? Furthermore, there is a “NOTICE” on the spec sheet that reads: “Interruption of power to a latching device may cause the output to change state when power is restored. If a magnetic field of sufficient strength is present, the sensor output will be in the condition dictated by the magnetic field.” In other words, you may get errors when the power is returned. Some sensors that were “off” before power was removed, could change to “on” and vice versa. I didn’t realize this until late in my testing. I need to keep an eye on it to see if this presents a problem in actual use.

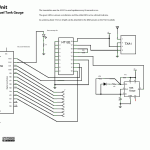
Sensor Main Logic Schematic
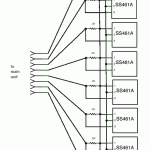
Sensor Array Schematic

The Sensor Main Logic Schematic shows that all the digital input/output pins on the Arduino are in use. D12 is used as a “low oil warning light”: when the level reaches the last sensor, this LED starts blinking on the sender unit. Most of the other digital pins are configured to accept input from eight hall effect sensors (refer to the Sensor Array Schematic).

The Holtek HT12E chip is an “encoder” that accepts a parallel 4-bit binary value (only 3 are used in this application) and sends it serially to an On-Shine TXA1 transmitter. The TXA1 is one half of a receiver circuit pair RXA27. These are normally used in radio-controlled toys, where simple commands like forward/reverse/right/left need to be communicated, or in simple security systems. The Holtek has an internal oscillator, configurable with a resistor between pins 15 and 16 (I’m using something close to 400k).

The Transmit Enable on pin 14 has to be low to send the data to the transmitter. In my original design, I wanted to transmit every 20 seconds, so I added a 555 timer chip in astable mode. This worked fine in test mode but before I closed up the boxes, I took the chip out and connected pin 14 to ground to force the unit to transmit all the time.

Arduino Sketch for the Sender Unit

The sketch tells the Arduino to poll each sensor from 7 to 0 (from the top sensor to the bottom sensor). If the sensor is “on”, then send the binary number of that sensor out to the transmitter. Once it hits a sensor that is “on” then it dumps out of the if/else loop.

/* version C of oil tank level
revised Sept. 23 09 to account for correct reading on
power-up
revised Oct. 5 09 to release pin 2 for use by radio transmitter
revised Feb. 16 2010 to refine sensor logic
revised Feb. 23 2010 to change active sensors (ignore sensor 10 rather than sensor 3)
by Michael B. LeBlanc, NSCAD University */

int level; //the reading from the oil tank gauge

void setup() {
pinMode(12, OUTPUT); // warning LED
pinMode(2, OUTPUT); // D0 to TX
pinMode(11, OUTPUT); // D1 to TX
pinMode(13, OUTPUT); // D2 to TX
}

void loop() {
// determine the gauge level
// start with the highest sensor and work down

int sensorValue = digitalRead(3);
if (sensorValue == 1)
{
level = 7;
digitalWrite(2,1);
digitalWrite(11,1);
digitalWrite(13,1);
}
else
{
int sensorValue = digitalRead(4);
if (sensorValue == 1)
{
level = 6;
digitalWrite(2,0);
digitalWrite(11,1);
digitalWrite(13,1);
}
else
{
int sensorValue = digitalRead(5);
if (sensorValue == 1)
{
level = 5;
digitalWrite(2,1);
digitalWrite(11,0);
digitalWrite(13,1);
}
else
{
int sensorValue = digitalRead(6);
if (sensorValue == 1)
{
level = 4;
digitalWrite(2,0);
digitalWrite(11,0);
digitalWrite(13,1);
}
else
{
int sensorValue = digitalRead(7);
if (sensorValue == 1)
{
level = 3;
digitalWrite(2,1);
digitalWrite(11,1);
digitalWrite(13,0);
}
else
{
int sensorValue = digitalRead(8);
if (sensorValue == 1)
{
level = 2;
digitalWrite(2,0);
digitalWrite(11,1);
digitalWrite(13,0);
}
else
{
int sensorValue = digitalRead(9);
if (sensorValue == 1)
{
level = 1;
digitalWrite(2,1);
digitalWrite(11,0);
digitalWrite(13,0);
}
else
{
level = 0;
digitalWrite(2,0);
digitalWrite(11,0);
digitalWrite(13,0);
}
}
}
}
}
}
}

delay(200);

// blink LEDs on pin 12 if tank is 1/8 full
if ((digitalRead(12)==LOW) && (level < 1))
{
digitalWrite(12,HIGH);
delay(100);
}
else
{
digitalWrite(12,LOW);
}
}


Creative Commons License
Remote Fuel Oil Tank Gauge by Michael B LeBlanc is licensed under a Creative Commons Attribution-Noncommercial-Share Alike 2.5 Canada License.
Permissions beyond the scope of this license may be available at mleblanc@nscad.ca.

A Design for a Remotely Readable Fuel Oil Tank Gauge

Last summer when I unpacked my electronics hardware (after 25 years) and began to learn about the Arduino microcontroller, I started on a project that would help be pick up where I had left off. I chose to tackle the problem of remotely reading the level in our residential fuel oil tank.

In Atlantic Canada, residential heating is limited to electricity and fuel oil. Our tank is in the garage, in the far corner from the household access door on the lowest level of our four-level backsplit home. In other words, it’s an inconvenience to determine the level of oil in the tank. This might be a non-issue except for the fact that we are not on a more expensive fuel plan where the company regularly tops off the level. If I don’t keep an eye on it, we’ll run dry. It hasn’t happened–yet.

I did some initial research to get a sense of what was already out there. Google Patents had many filings that were interesting, such as “Residential fuel tank oil level” “Remotely readable fuel tank indicator system” and “Hall-cell liquid level detector“.

One design limitation that I had imposed from the beginning was that I did not want to change anything on the tank itself. The level detector had to be completely passive and unconnected in any way from the tank itself. My reasons were twofold:

  1. I did not want to change the status of my house insurance by affixing a non-standard item to the oil tank
  2. I wanted to be able to easily disconnect the hardware from the oil tank for maintenance of the unit

The above-mentioned patents were interesting to me because they used hall-effect sensors. Used as proximity switches, these devices can detect the change of a magnetic field without being mechanically coupled to the item being sensed. They are very inexpensive and solid state, so they are very dependable and have a practically infinite service life.

There is a commercial product available which already does some of what I was looking for. Syba Systems in Connecticut markets several devices such as the “LED at a Glance” which fits over top of the mechanical tank level guage and shows the level using an array of LEDs. “Oil Alert” is similar except that when a low oil level is detected, the unit beeps.

One last example of ‘prior art’ is Tom Laureanno’s “Oil Level Indicator Project/Idea” where he describes placing a magnet on top of the mechanical level, and effecting a change of state of a reed switch.

The Remote Oil Fuel Level Gauge

Reed switches are mechanical devices, and they tend to be rather large. Rather than actuate just one switch (resulting in an ‘idiot light‘ scenario, I want to get a sense of the level in several stages, which means that I would need several sensors along the length of the float level. I would be able to watch over time the level go down as we use the oil in the tank.

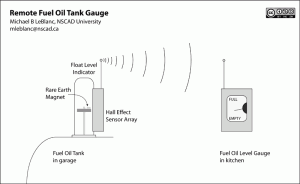
So this is my idea: To build an array of hall-effect sensors and affix them to the outside of the mechanical float level.

  1. On the float level, a small rare-earth magnet is glued to the float indicator.
  2. As the float indicator rises or falls, the magnet field changes are sensed by the hall-effect sensors.
  3. These sensors are read and interpreted by the Arduino, which transmits the float level information by radio to a receiver elsewhere in the house.
  4. The received information is decoded and another Arduino microcontroller drives an indicator, which in the case of my first prototype, a stepper motor, but it could also be an LED array or an LCD display.

In subsequent posts I’ll outline the design and implementation of the system.


Creative Commons License
Remote Fuel Oil Tank Gauge by Michael B LeBlanc is licensed under a Creative Commons Attribution-Noncommercial-Share Alike 2.5 Canada License.
Contact the writer for permissions beyond the scope of this license.